Yuki tries to recognise and process as many documents as possible automatically, based on IDR and default values. However, a relation on a document may be new, the invoice may not be recognised, or extra information may be needed to book the entry in Yuki. In that case the invoice has to be processed manually. This article explains how to process a purchase invoice.
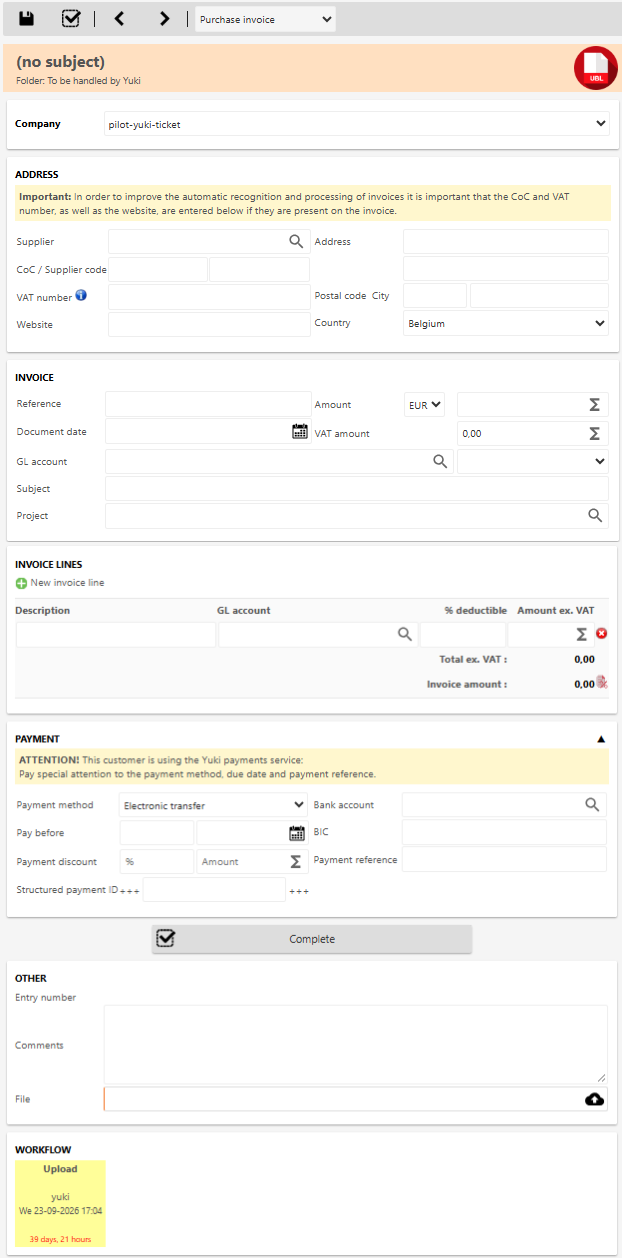
The entry screen of a purchase invoice has five important parts:
- The administration: only visible if the domain contains several administrations
- The address block
- The invoice information
- The (split) invoice lines
- The payment details
Administration
This field is not always present. It is only visible if there is more than one administration in the domain. In this field you must indicate which administration the purchase invoice belongs to.
Address block
The supplier is recorded in the address block. Yuki pre-fills this block as far as possible. How reliable this pre-filling is depends on the type of document.
Invoice as PDF or image
For a PDF or image, Yuki reads the data from the document using text recognition (OCR). The automatic document processing (IDR) uses this data to recognise the supplier and the fields. Text recognition can make mistakes, for example with a poor scan or an unusual layout. Always check that the proposed supplier and the address details match the invoice. Fields coloured yellow deserve extra attention.
UBL invoice
For a UBL invoice (for example via Peppol), no text recognition is performed. The data is taken directly from the XML file that the supplier created. This pre-filling is therefore more reliable than for a PDF. Still, briefly check that the supplier is linked correctly, especially if the name or address in the XML file differs from what you know.
If the address is missing or incomplete, complete it as fully as possible. To do so, you can look for the supplier among the relations of the administration or among the relations validated via the KBO or VIES. A supplier is only in the administration if an entry has already been booked on that supplier in the past.
Looking up an address
To check whether the supplier already exists, enter the name in the Supplier field. As soon as you type the first letters, a list of possible suppliers appears in the field.
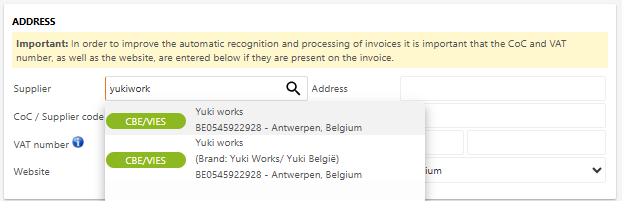
The window shows the relations that are present in the administration. It also shows relations that were validated via the KBO or VIES. These are always relations that contain the letters you typed.
If you see several suppliers that match the description, preferably choose the supplier that is already in the administration. If the supplier is not yet in the administration, but you can find them as a validated relation via the KBO or VIES, choose that relation. If you find no supplier at all that matches the description, enter the complete name as it appears on the invoice.
If you have chosen an existing supplier, the fields in the address block are filled as far as they are known. Check that everything is correct using the complete address details. If it is not, you can clear the Supplier field and search again. If fields are still missing, you can complete them with the details on the invoice. The VAT number, the company number and the website of the company are very important for the automatic recognition (IDR).
Invoice information
After you have entered, adjusted and/or checked the address, continue with the invoice information. Fill in the left column first and then the right column. Use the Tab key to jump from field to field.
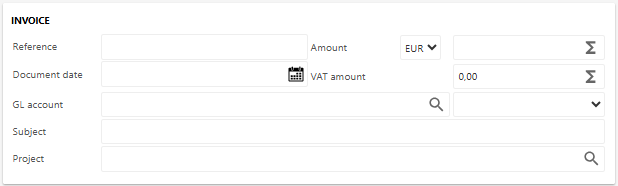
Reference
Enter the invoice number here. If there are several numbers on the invoice (for example an order number and an invoice number), choose the most appropriate one, but above all make sure you are always consistent.
Entering the correct invoice number is important for catching duplicate invoices and for automatically matching payments to invoices. Sometimes no invoice number can be found (for example on a receipt). In that case, use the date as the invoice number, for example.
Document date
For a purchase invoice, enter the date of the invoice here. This field is sometimes coloured yellow. In that case the IDR has filled in a date that may be wrong. This can be because it is the date on which the document was uploaded (because Yuki did not recognise the date) or a date in the future. Yellow fields deserve extra attention, so check that the value is correct.
Amount
In this field you must enter the total amount of the invoice.
Calculations
Sometimes you have to add up a few amounts. Use the calculation function in the field for this. For example, type 1200+150,56 and then press the Tab key or click the "=" sign behind the field.
Credit notes
Some invoices are credit notes. In the entry screen, you always enter the amount as negative for a credit note. This also applies to the VAT amount.
Foreign currency amounts
Check carefully whether the invoice is in EUR. If the amount is in a foreign currency, select the correct currency for the Amount field. If the required currency is not visible, you can activate it by clicking the logo/company name at the top left and then choosing Settings. Then click the Countries or currencies button.
When the invoice is processed, Yuki automatically converts the amount to EUR in the background. For this, Yuki uses the exchange rate on the document date. In the open creditors list and other overviews in Yuki, the invoice amounts are therefore shown in EUR. When the payment is matched to the invoice, any exchange rate difference can be written off.
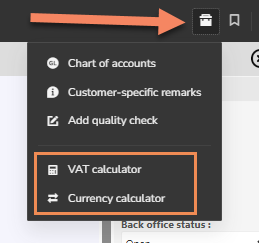
You can also convert the amount yourself using the Currency calculator, which you open via the toolbox button at the top right.
VAT amount
In this field you must enter the total VAT amount on the invoice. If, for example, 21% VAT applies, you can also calculate the VAT amount by typing 21+%<total amount> in the field. So 21+%1210 gives 210.
VAT code
In this field you select the correct VAT code. This field is filled automatically once the amount and the VAT amount have been entered, but it can still be adjusted if needed.
Ledger account
Enter the ledger account here. If you want to book on several ledger accounts, you can add them by clicking Add new invoice line.
Subject
The subject is determined by Yuki itself. If you leave this field empty, Yuki automatically fills in the following subject: "Invoice from <supplier name>, <Ledger account(s)>", for example "Invoice from Proximus NV., telephone and internet costs".
Project
This field is only visible from a Medium bundle onwards. The purchase invoice can then be assigned to a specific project.
The (split) invoice lines
This section is used to split an invoice across different ledger accounts.
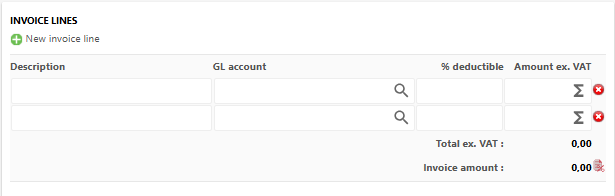
You can use ledger accounts with a different deductible VAT percentage. The deductibility of a ledger account can also always be adjusted manually per invoice line.
Payment details
The details on how the invoice has to be paid are important for the further processing of the invoice. When a customer uses the payment list in Yuki, extra care is needed to indicate the payment method, the due date, the structured communication or the payment reference correctly.
Payment method
In Payment method, choose the way the invoice will be paid. The options are:
- Bank transfer: an invoice that still has to be paid by bank transfer can be recognised by a transfer order attached to it or by a text on the invoice such as "Please pay the invoice before …". If an invoice has to be paid by bank transfer, a bank account is mandatory. Check whether a bank account number is already known (magnifying glass) or look for the supplier's bank account number on the invoice.
- Direct Debit
- Cash: cash payment mostly occurs with receipts. The payment method Cash can only be chosen if the company has a cash register from which the payment was made. This payment method is not available if no cash option has been chosen.
- Debit Card: the customer paid with Bancontact. This is often stated on the receipt. Look for indications such as "Bancontact", "Maestro", etc.
- Credit card: if the customer paid with their credit card, the receipt often shows an indication such as "MasterCard", "Visa", "American Express" and the last four digits of the credit card number. Here too it can happen that it is a private credit card. If you know that, choose Paid privately.
- Private payment: if the customer paid the invoice privately (in cash, by credit card or from a private bank account), choose Paid privately. You then need to indicate who made the payment. Depending on the person, the amount is booked on the current account of the director or on the current account of the staff.
Bank account
The bank account number only has to be entered if the payment method is Bank transfer. For the other payment methods this field is not available. All bank accounts are shown with the IBAN number.
BIC code
The BIC code must be filled in for payments to a foreign bank account.
Pay before
Enter the due date here. The due date is sometimes also stated as "Please pay before <date X>". In the due date field you can enter the number of days of the payment term, which adjusts the due date.
Cash discount allowed (only visible if activated)
Enter the percentage of the payment discount or the amount of the discount here.
Payment reference
Enter here the description of the bank transaction that was supplied with the payment, or that has to be supplied (if the payment list is used).
Structured communication
If a structured communication is supplied, enter it here. If the payment list is used, it can also be entered here. This field takes priority over the Payment reference field.
When you have filled in all the necessary details and added any notes, you can click the Complete button to have the entry booked and open the next document in the workflow.
Duplicate invoices
After the purchase invoice is saved, Yuki checks whether it could be a duplicate. If so, you will see a pop-up window in which the invoice is compared with a very similar invoice. Check whether the supplier, date, amount and invoice number are the same. If it is not the same invoice, click the Not a duplicate button. If the "suspect" invoice really is a duplicate, click the Delete button or bundle the invoice as a continuation page of the other invoice by clicking the Merge button.
Booking
A purchase invoice is placed by default in the Purchases/Invoices folder. This also creates an open item for the supplier (account "440000 Creditors").